Training with a Power Meter: What Every Cyclist Should Know
Power meters are the only objective way to measure cycling performance. Since their invention in the 1980s and more recent widespread adoption, they have completely revolutionized how cyclists train. How much do you know about power meters and how to use them?
What Is a Power Meter?
Simply put, a power meter is a device that measures how much energy your legs are pedaling into your bike’s drivetrain, in real time. This energy is expressed in watts.
Most power meters use tiny devices called Strain Gauges, which continually measure the microscopic flexing of a drivetrain component to determine torque. Power = Force x Velocity, so by combining measured torque with leg speed (cadence), the power you’re putting into the pedals can be calculated.
While heart rate monitors track your relative effort and speedometers quantify your effort’s results, power meters measure actual work itself. The same power output might feel easier or harder to produce in different situations, but 250 watts is 250 watts, no matter the setting.
How to Train With a Power Meter
Power meters offer two major opportunities for cyclists in racing and training. First, they allow a rider to accurately measure and adjust their performance in real time. Second, power meters allow cyclists to objectively assess their abilities. From this insight an athlete’s training can be calibrated and fine-tuned, with changes in performance easily tracked.
5 Key Tips for Training With Power
- Test your FTP often. The more accurately your workouts are calibrated to your current fitness, the more productive they will be.
- Follow a training plan and leave the details to us. There’s no better way to take advantage of power-based training. Plan Builder makes it easy!
- Calibrate your power meter before each workout. Most power meters have a zero-offset or calibration option to ensure consistent readings and accurate data.
- Stay consistent. Life happens and you’ll inevitably miss workouts or have bad days, but the more consistent you can be with your training, the better the results.
- Remember that your power meter is a means to an end. Your FTP is not a measure of your self-worth. Instead, it’s a tool to help make you faster over time.
FTP Testing
The most common power benchmark of cycling ability is FTP, or functional threshold power. FTP approximates the highest sustainable power a cyclist can maintain for an hour. This value serves as a central metric in training.
There are many different protocols for testing FTP. TrainerRoad’s preferred method is the Ramp Test, which begins very easily and gradually increases in intensity each minute. Riders are challenged to match the rising power target as long as they can, and FTP is calculated from the point at which they are unable to continue. Unlike other methods, the Ramp Test is quick and comparatively easy, and it does not require pacing strategies. As a result it incentivizes frequent assessment, which leads to more finely-tuned workouts and better long-term data.
Power Zones
Knowing your FTP is great, but doesn’t do much on its own. The real value of riding with power lies in how it can be used to inform your training. This is achieved through the use of Power Zones, each defined as a percentage of FTP. Riding in each zone stresses the body in different ways and stimulates different physiological responses. Power zones allow training to purposefully target specific abilities, while simultaneously avoiding overtraining. After you take an FTP test, TrainerRoad automatically calculates your zones for you, and in doing so, customizes the intensity of your upcoming workouts.
| Training Zone | Power |
Rate of Perceived Exertion (RPE) |
|---|---|---|
| Active Recovery | < 55% FTP | 2 / Recovery |
| Endurance | 55% – 75% FTP | 6 / Easy-Moderate |
| Tempo | 76% – 87% FTP | 7 / Moderate |
| Sweet Spot | 88% – 94% FTP | 7 / Moderate |
| Threshold | 95% – 105% FTP | 8 / Moderate-Hard |
| VO2 Max | 106% – 120% FTP | 9 / Hard |
| Anaerobic Capacity | > 120% FTP | 10 / All-Out |
Interval Training
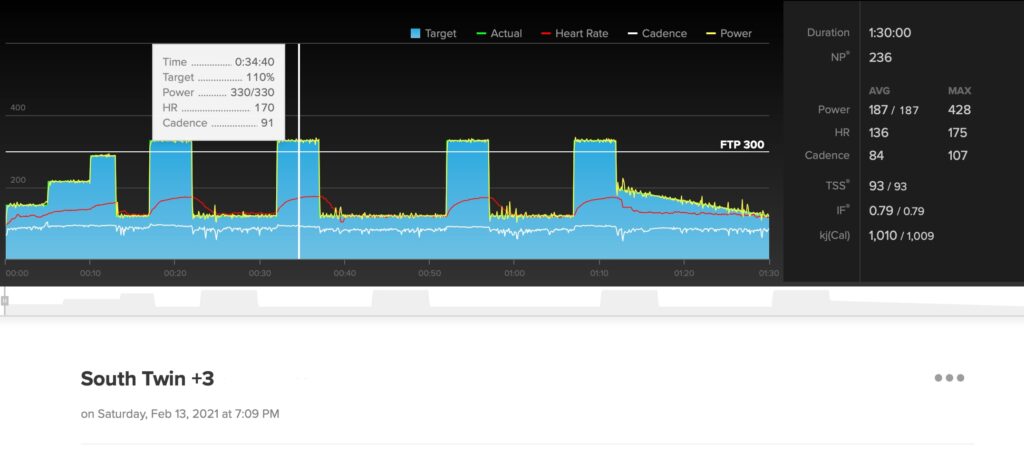
Workouts designed around power zones follow a structure known as interval training. Interval workouts include an alternating pattern of high-intensity efforts and easier recovery riding. Each interval challenges you to maintain a certain target power, and the length of the interval (and subsequent recovery) varies depending on which power zone it utilizes.
Interval workouts are organized in a schedule called a training plan. Different power zones are addressed on different days, and regularly-scheduled rest days allow recovery. After every few hard weeks of training, an easier rest week is also included. This rhythm of progressive stress and recovery is called periodization.
Adaptive Training
Get the right workout, every time with training that adapts to you.
Check Out TrainerRoadTraining With Power Vs. Training With Heart Rate
Before affordable power meters became widely available, many athletes used heart rate monitors to guide interval training. Compared to power, heart rate-based training has several disadvantages- first, it is a lagging indicator. Heart rate often takes several seconds or even minutes to fully increase during a hard effort, whereas power meters accurately detect changes instantaneously. Second, heart rate is extremely subjective. Fatigue, caffeine intake, illness, temperature, and any number of other factors can influence heart rate. There’s no guarantee that matching a heart rate target will result in the same riding intensity one day as it will the next.
Power is now recognized as the best way to measure and structure training. Heart rate can still offer some valuable insights, but is best used alongside power to paint a full picture of your training and fitness.
Common Power-Based Training Terms
- Functional Threshold Power (FTP) – The maximum average power you can hold for one hour
- Average Power – The overall average power sustained over a given period, measured in watts and including zeroes from coasting.
- Normalized Power (NP) – A mathematically weighted version of average power, estimating the power that could have been produced over a time period had it been ridden steadily with no coasting or surges
- Intensity Factor (IF) – A measure of how intense a ride is; IF of 1.0 results from an hour ride at FTP.
- Training Stress Score (TSS) – The relative training stress generated by a workout. Riding for an hour at FTP results in 100 TSS.
Analyzing A Training Session
One of the benefits of training with a power meter is that you can dive into the details after your ride. To start, just click on the latest workout from your career page to view all the relevant training data. This can be helpful to identify successes and limiters or the relationship between power and heart rate.

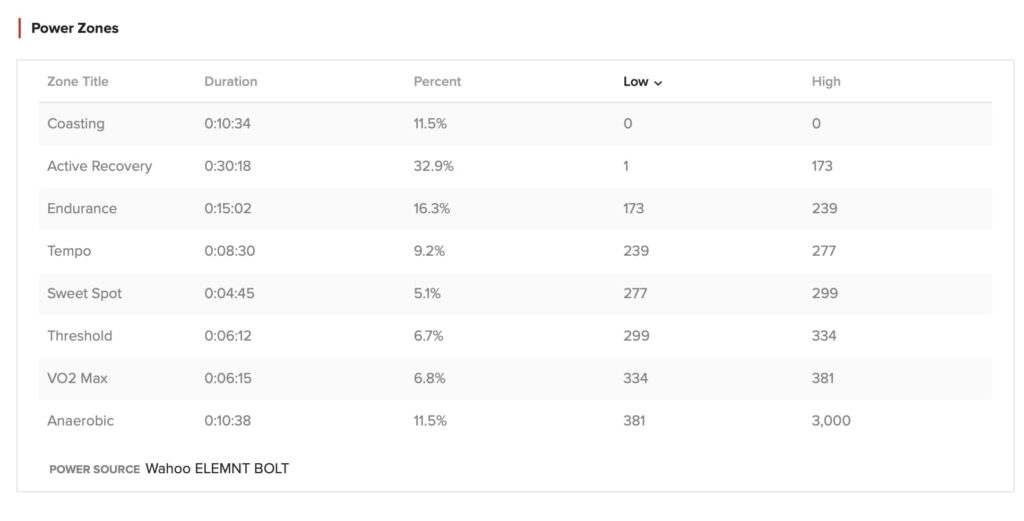
You can also analyze how much time you spent in each training zone, which will correlate to the particular energy system you’re emphasizing. Viewing time in zone is especially helpful for analyzing races, events, or group rides. You can glean information about your efforts and efficiency. The example below is from a local group ride, and it shows that the rider spends over 18% of the ride at VO2 Max or higher. By comparison, 60.7% of the ride was spent in or below the Endurance power zone—meaning the ride was very punchy.

Tracking Power PRs with Your Power Curve
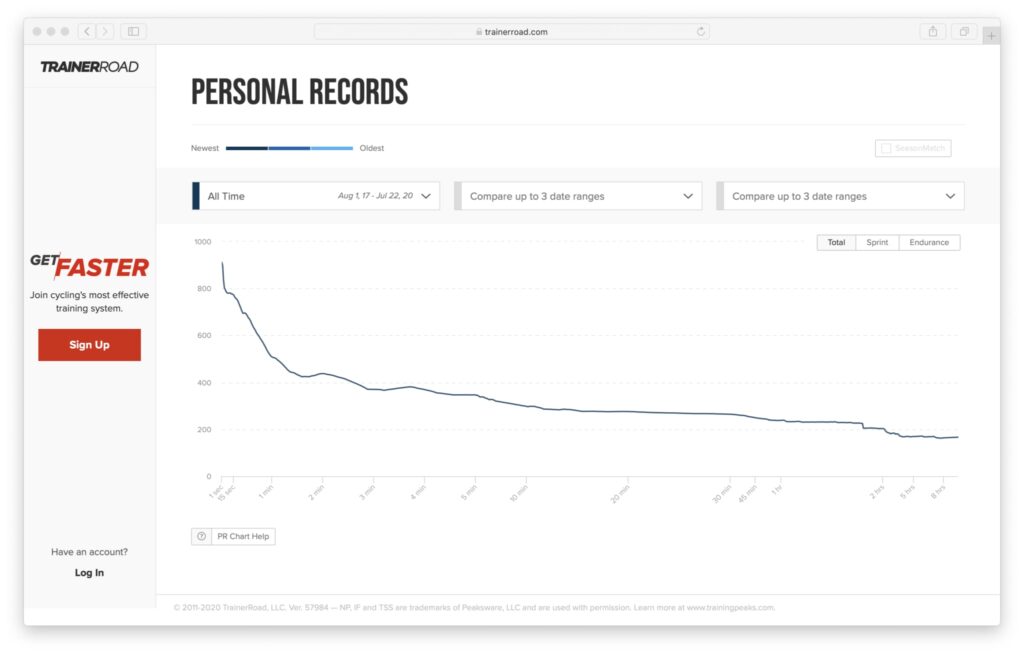
Training with a power meter can give you a clear picture of your strengths, weaknesses, and progress over time. A power curve is a graphical representation of the power you can generate over time. On the x-axis is time, and on the y-axis is watts. All power curves are unique, but all are generally higher on the left end and lower towards the right.

With TrainerRoad’s power curve chart you can easily track your power PRs to see how you’re improving. FTP is an excellent growth metric, but PRs provide a comprehensive and detailed picture. In addition to FTP, Power PR’s confirm exactly how your fitness is growing within specific time durations.
Different Power Meter Options
Power meters can be located almost anywhere on your drivetrain. Each type carries different advantages and disadvantages; here are a few of the most common options.
Crank Arm
Crank arm-based power meters include Stages, 4iii, and Rotor. Some models measure only one leg (usually the left) and double this reading; these are among the most affordable power meters available and are extremely popular. A drawback of crank arm-based power meters is that they are not always easy to move between bikes; there can also be clearance issues fitting them onto some frames as these crank arms are slightly wider than normal.
Crank Spider
These include Quarq, Power2Max, and SRM. This is the original power meter location and remains popular. These meters are known for accuracy and most can also offer an approximation of left-right pedaling balance. Downsides include the challenge of transferring between bikes, especially due to crank or bottom bracket compatibility.
Pedal
Pedal-based power meters including Garmin Vector, PowerTap P1/P2, and Favero have gained acceptance over the last few years. These tend to be easily swapped between bikes and offer accurate left-right reading. Drawbacks include cleat limitations, as well as somewhat bulky housing that may be more likely to clip the ground in tight corners.
Rear hub
The PowerTap hub is one of the longest-available and best-known power meters, and generally regarded among the most durable and accurate. By measuring power further along in the drivetrain, it captures a more accurate picture of how much energy is actually being transferred to the rear wheel. While it is easy to move from bike-to-bike, it limits the rider to the use of a specific wheel. This limitation has decreased the popularity of hub-based meters over the last few years.
Smart Trainer
Modern indoor smart trainers such as Wahoo KICKR, Saris H3, and Tacx Neo include power measurement. Obviously, this limits the rider to use of power while indoors without an additional power meter. However, the ability to automatically control resistance during a TrainerRoad workout makes these an excellent option.
Virtual Power
For athletes without a smart trainer or power meter, TrainerRoad’s Virtual Power® is a fantastic option for indoor training. All you need is a speed sensor, and VirtualPower can calculate power on most indoor trainers.
For more cycling training knowledge, listen to Ask a Cycling Coach — the only podcast dedicated to making you a faster cyclist. New episodes are released weekly.
Photo credit: Alonso Tal
Reference: Allen, Hunter, et al. Training and Racing With a Power Meter. 3rd ed.; VeloPress, 2019.
