Tips -
The Ultimate Buyer’s Guide for the Best Kids Bikes
Looking to buy a bike for your child?
You’d probably notice that there are many types of kids’ bikes available today. They all come in various sizes, colors, configurations, and price points.
So, where do you start looking?
In the past, we probably just ride whichever bike our parents buy, or inherited from our older siblings. Today, we’re spoilt for choices when buying bikes for our children.
On this page, I’ll lay out the 11 things you’ll need to know to make a better and informed decision about your child’s bike. You want to get a bike that suits them so that they can enjoy the ride. That’s the most important thing right?
So, let’s dive in!
1. Choosing the Correct Bike Size
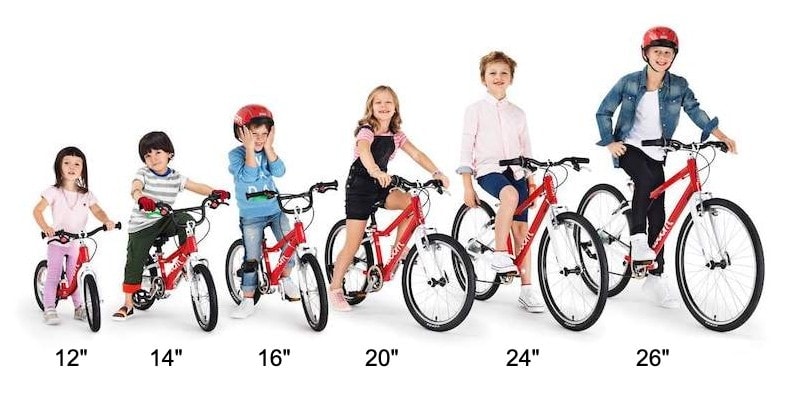
One of the most important factors, yet also one of the trickiest ones to get right is the correct bike size.
We can’t assume that children of the same age will ride the same size bike. Each of them grows at a different rate and they all stand at different heights.
Kids’ bikes are sized according to their wheel size, such as 10″, 12″, 16″, 20″, 24″, and 26″. As the child grows older and taller, they would require a larger bike.
For many years, parents have been choosing the bike size depending on its wheel size. The chart below will give you a good starting point of the suitable wheel size.
But keep in mind that it’s only a starting point. There are other factors involved such as height and inseam measurement before deciding the final bike size.
The table below shows you a bike’s wheel size vs the child’s age and height.
| Kids Age | Height | Wheel Size | Examples |
|---|---|---|---|
| 18 to 36 months | 28" to 38" | 12" | Co-op Cycles REV 12 |
| 3 to 4 | 36" to 40" | 14" | Woom 2 |
| 4 to 6 | 38" to 48" | 16" | Trek Precaliber 16 |
| 5 to 8 | 48" to 68" | 20" | Electra Sprocket 20 |
| 7 to 10 | 56" to 66" | 24" | Early Rider Works 24 |
As you can see from the table above, the age groups can have quite a big gap and even have some overlapping. For example, a 3-year-old child can ride a 12″ or 14″ bike.
Confusing, isn’t it?
That’s one of the reasons you can’t find the ideal bike size judging the child’s age and height alone.
Instead, you’ll have to pay attention to the child’s inseam as well.
What’s an inseam?
The inseam is the length from the child’s crotch to the floor.
The video below shows you how to measure the inseam by yourself at home.
When measuring the inseam length (from the crotch to floor), you should make sure that the child’s feet are flat on the ground, instead of them standing on the tip of their toes.
This ensures proper measuring which allows you to find an ideal bike size before jumping into the next steps.
Geek Tip : Use a combination of child’s age, height, and more importantly, inseam measurement to get the ideal bike size.
2. Bike Frame Design
Other than choosing the correct bike size, the bike frame’s design plays an important role too. There are two important things to pay attention to regarding frame design – wheelbase and handlebar length.
While most parents will do their best to try and get the saddle height right, they tend to forget about these two.
What many don’t know is that the child’s position on the bike will determine how well they can ride and how much will they enjoy it.
So, let’s take a deeper look.
Wheelbase
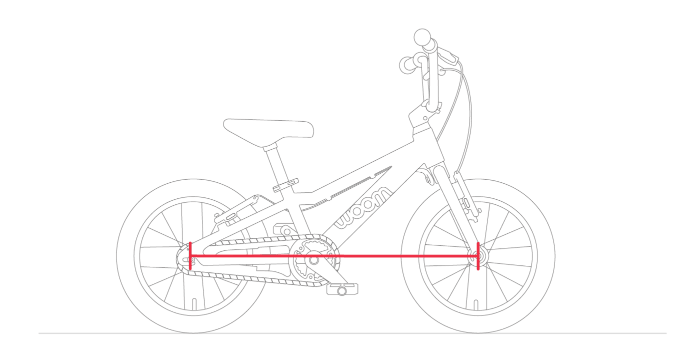
The wheelbase is the distance between two wheels.
If you’re looking for a first pedal bike for your child, I’d recommend you to stay away from bikes with a higher center of gravity and a short wheelbase. The reason is that they’re harder to ride, and there will be higher chances that the child might lose their balance much easier.
Geek Tip : Bikes with a longer wheelbase will provide more stability and control for the child.
Handlebars
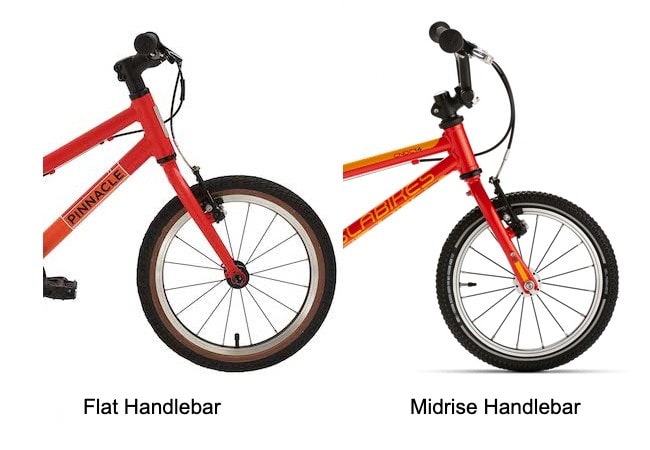
Other than inspecting the handlebars for the grip, accessories, and comfort they provide, you should also be inspecting their position, height, and width.
Handlebars that sweep back, or are placed too low will put a strain on the child’s neck and won’t offer as much maneuverability.
Mid-Rise Handlebars
Therefore, make sure to find a mid-rise handlebar that offers plenty of space for the knees and allows the child to lean slightly forward. This increases security, balance, and make it easier to pedal.
While flat handlebars are very close to the frame in terms of height, mid-rise handlebars offer a decent height which allows children a better back posture while riding.
High-Rise Handlebars
There are also high-rise handlebars that raise the handlebar a lot higher from the frame. However, this isn’t ideal for young children.
When you’re inspecting the handlebars, put your child on a bike and check their body position as they’re seated properly. Don’t forget to also have both their hands on the handlebars.
You don’t want your child to be leaning forward a lot, but you definitely don’t want them to lean backward either.
Flat Handlebars
Flat handlebars often make children lean too forward, while mid-rise handlebars will offer decent height and support.
The neutral riding position for a child is when the child’s back is leaning forward slightly, at an angle of about 65 degrees.
Children shouldn’t be having a hard time reaching the handlebars, and the width should be just slightly wider than their shoulders for a most comfortable position.
Geek Tip : For better balance and stability, always choose a long wheelbase, coupled with mid-rise handlebars.
3. Q-Factor
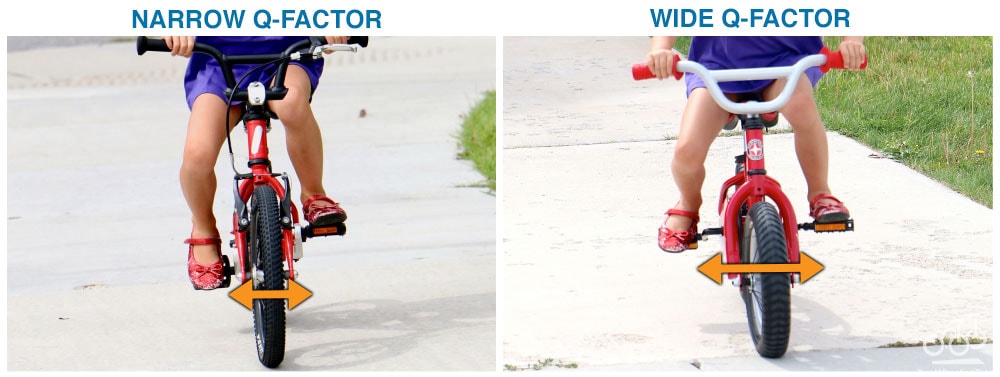
You’d probably be wondering what’s a Q-Factor?
Q-Factor is the distance between the outside of both left and right crank arms (at the point where the pedals are installed).
A bike with a lower Q-factor is easier to pedal, especially for young children. They’ll be able to pedal without splay and it will provide an efficient pedal stroke.
However, if the Q-Factor is high, this means that they’ll have to move their legs outward, instead of keeping them neutral with the bike frame.
Not only this will put the child in an uncomfortable position, but it will be inefficient and might lead to injuries.
Therefore, a lower Q-Factor is something you should be looking for. But be aware that budget bikes most likely don’t come with a small Q-Factor due to the specialty parts required. They’re usually found on more expensive bikes.
But if that’s what it takes to give comfort and efficiency to your kid – we definitely find this to be an important factor when making a decision.
Geek Tip : Go for a bike with a smaller Q-Factor.
4. Bike Weight
Bike weight is a factor that shouldn’t be ignored because it plays an important role, much more important than most people think.
Did you know : Most kid bikes weigh about 50% of their body weight?
This isn’t ideal at all.
While adults ride bikes that are about 20% of their weight, kids should be riding bikes that are less than 40% of their weight.
While this doesn’t require precise calculations, going for the lightest bike you can find out there is still a great way to go about this.
When you’re comparing the weight of a kid’s bike, you should take a few factors into consideration first.
Cheap vs Expensive Kids Bikes
Expensive bikes are often perceived as lighter.
Sometimes, you’ll come across cheaper bikes which are very similar in weight to expensive bikes.
But, there’s more than meets the eyes. In most cases, the cheaper bikes lack accessories and components that are present inexpensive bikes.
Therefore, when comparing the weight, take into the consideration value of accessories and components a bike offers. This will allow you to find out which bike is better, even if they are similar in weight.
Geek Tip : A lighter bike is easier to ride for the child.
5. Number of Gears
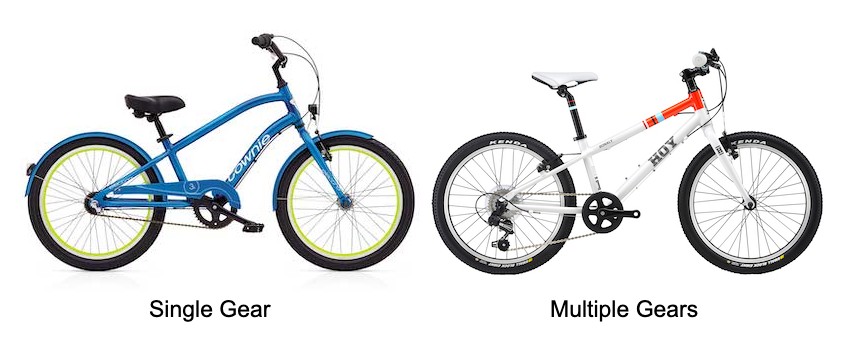
All kid bikes up to 12″ in size come with a single gear. Sometimes, it’s also referred to as single speed.
For 16″ bikes, there is a mix of single-speed and multiple speed. Bikes from 20″ and above usually have multiple gears, unless they’re purpose-built as a single speed.
Does your child need a bike with gear?
The easiest way to determine whether your child needs gear is to observe how they ride uphill.
Do they struggle with a low cadence?
Do they come off the bike and walk the bike?
That’s where you know they’ll need a lower gear to conquer the hill.
But the question is,
How many gears?
Kids’ bike gears range anywhere from 7 to 24 gears, depending on the configuration. You’ll have to calculate the gear ratio.
The gear ratio is the ratio between the chainring size to the rear sprocket size.
Let’s take a look at how the gear ratios work.
| Front Chainring | Rear Cog | Gear Ratio | |
|---|---|---|---|
| Bike 1 | 24T | 14T | 1.8 |
| Bike 2 | 26T | 11T | 2.4 |
The table above shows the gearing setup for 2 different bikes. The main difference between them can be summed up as follows:
- Bike 1 has lower gears, hence more suitable for uphills
- Bike 2 has higher gears, hence more suitable for speed
The lower the gear ratio, the easier it is for the child to ride uphill, similar to how the gearing for your car works.
In case you’re getting a bike with gears, you can expect to see bikes equipped with 7/8, 14/16, or 21/24 gears. It all depends on the front chainring.
If there are one front chainring and 8 rear sprockets, then the bike has 8 gears. Or if there are two front chainring and 8 rear sprockets, then it has 16 gears.
You get the idea…
Geek Tip : Gears will definitely help the child ride across any terrain, especially uphills.
6. Types of Gear Shifters
If you’ve decided to get a bike with gears, that’s great.
But now you’ll have to go a step further to determine the type of gear shifters used.
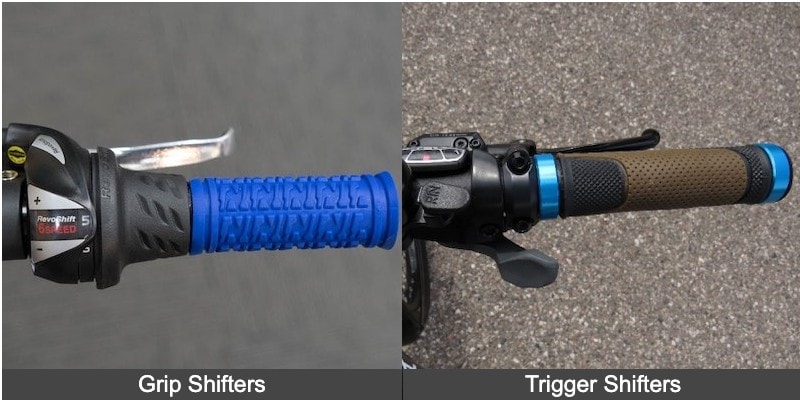
There are two most common gear shifter types :
- Grip shifters are built into the handlebar grips. The gear change is triggered by turning the grip.
- Trigger shifters usually sit slightly below the handlebar. The gear change is triggered with a push action. Some refer to them as thumb shifters.
Grip shifters are more beginner-friendly and are a good option to start with. Once the child has some experience and really enjoys using gears, trigger shifters would be an ideal choice.
Geek Tip : Teaching a kid how to use gears on a bike is always simpler with a grip shifter type.
7. Drive System
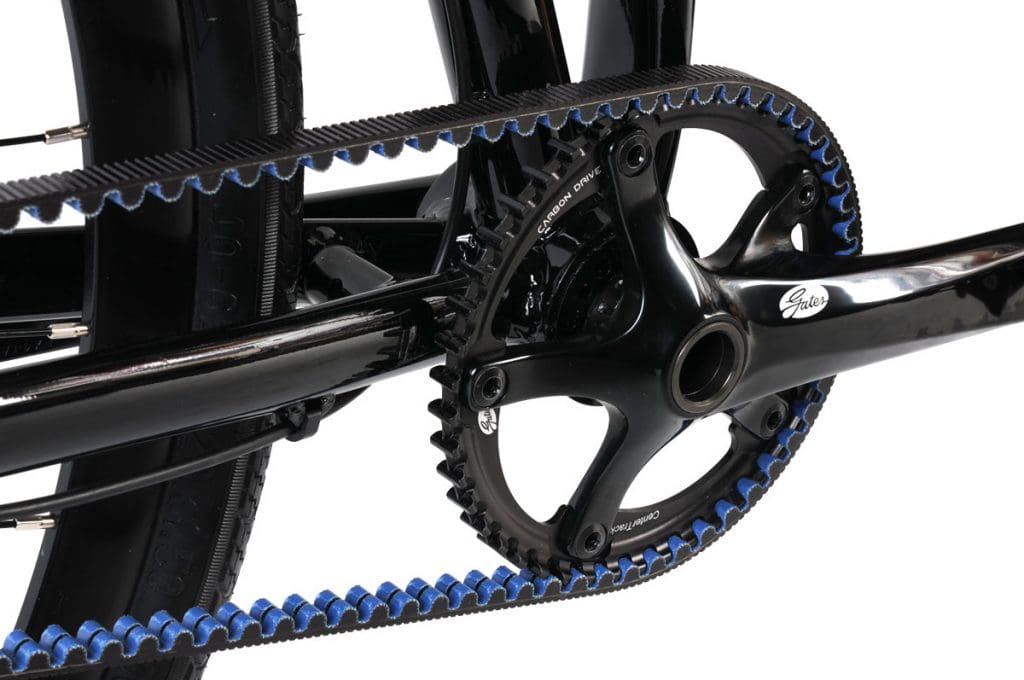
Most of us are familiar with the chain drive system.
But did you know there’s another alternative called the belt drive?
The belt drive system uses a rubberized belt instead of a chain which can never come off as easily as chain drive would. It also eliminates grease and dirt, and requires low to no maintenance.
Even though the belt drive system has been introduced as a drive system for kid bikes at first, it’s becoming very popular with adult bikes, especially in commuter and urban bikes.
Belt drive is mainly maintenance-free as it doesn’t require the use chain lube, which can occasionally get messy. If you go for a chain drive system, you’ll have to make sure the chain is always lubricated and clean just enough so the kids don’t get messy.
Geek Tip : Belt drive systems are maintenance-free and getting popular among kids bikes.
8. Tires
Generally, there are two main types of tires used in kids’ bikes.
Foam tires are widely used in kids’ bikes up to 12″. Their solid tires are made out of foam and don’t require an inner tube. Hence, they’re maintenance-free and eliminates the risk of mid-ride punctures.
On the other hand, bikes from 16″ onwards usually come with air tires. Basically, they have an inner tube and you’ll need to pump the tires up. With air tires, you’ll get a type of tire threads,
- Road/slick. Road tires are ideal for smooth tarmac surface and have lower rolling resistance, hence faster.
- Knobby. They’re designed to provide more grip and traction off-road and not as fast as slick tires on the tarmac.
From my experience, knobby tires are more versatile as they allow the children to explore off-road routes which are way more fun than riding on the tarmac.
Geek Tip : Choose your tires depending on the type of terrain your child will ride the most.
9. Types of Brakes
There are two main types of brakes found on kids bikes,
- Hand brakes
- Coaster brakes
Hand Brakes
Hand brakes rely on the brake levers which are usually hard to reach by children who have smaller hands, are too hard to press, or aren’t very responsive.
If you go with hand brakes, look for brake levers that are adjustable for smaller hands. Make sure that once properly adjusted, they don’t require a lot of force and are very responsive. This will help your child learn how to properly use the brakes.
Coaster Brakes
Coaster brakes only work for the rear wheel, and they’re activated by backpedaling.
You will find coaster brakes on most 12″ and 16″ bikes, but rarely on 20″ bikes and above. Most of them also use a combination of hand (front) and coaster brakes (rear).
A thing to note about coaster brakes is that some children will start to backpedal when they feel they’re starting to lose balance.
If they ride a bike with hand brakes, they’ll be able to freely backpedal, which would help them regain control of the bike. However, if they backpedal on a bike with coaster brakes, this will cause an unexpected stop which can be dangerous.
Ideally, you’d want to look for freewheel bikes (bikes with hand brakes instead of coaster brakes) since they will be a lot easier for children to master their bike skills.
While it might not be a cheaper option, it’s an important one.
Geek Tip : Make sure the hand brake levers are adjustable and properly adjusted to suit your child’s hands.
10. Training Wheels
Most of us learned to ride bikes with training wheels in the past, but with technology improvements, our children now have the chance to learn to ride a bike with the help of a balance bike.
Training wheels aren’t a bad idea for a child to get the feel of riding a bike at first. However, once you remove the wheels, they’ll still have to learn how to keep a balance.
Read More : Balance Bikes vs Training Wheels : Which is Better?
Therefore, training wheels are recommended for children up to the age of 3. Children between the ages of 4 to 8 most likely have developed physical coordination and agility to achieve a good balance on a bike without training wheels.
Other than coordination and agility, it requires self-confidence and motivation to learn to ride a bicycle, so that’s something you shouldn’t forget either.
In case your child wants to rely on training wheels a bit longer, there is nothing wrong with it!
Geek Tip : Training wheels help the child to master pedaling, steering, and braking, except for balancing.
11. Warranty
Whether you’re purchasing a cheap or expensive pedal bike, you’ll most likely get a warranty. The length of the warranty will vary, but it usually covers the entire bike for manufacturer defects.
One thing that is excluded is crashed.
Expensive bikes usually come with a longer warranty period. For example, Woom Bike offers a 5 years warranty on the bike frame and fork, and 24 months for the components.
This only proves how investing in quality high-end bikes is totally worth it. That’s because you’d want to have the flexibility to pass on the bicycle to a second child.
Geek Tip : Read and understand what is and is not covered under the warranty before you purchase.
Summary
Getting the correct bike frame size might be a hassle, but once you get that right, everything else becomes a lot more fun.
Even your child will be able to enjoy the process and learn a thing or two.
While it can be quite hard to find a very cost-efficient and quality bike for a child knowing he or she is going to outgrow it, following the most important steps mentioned in this article will save you a lot of time, hassle, and money.
And lastly, it will provide your child a lot of fun and memorable hours, making the learning experience a positive one.

