Accessories-Info, Electronics-Info, Tips -

7 Tips to Shift Gears on Your Bike Efficiently

Knowing how to shift gears, and what gears to use is a key skill every cyclist need to acquire. Usually, it comes with a lot of practice and experience.

Selecting the right gear at the right time is part science, part instinct, and part experience. There are some fundamentals about bicycle gears that every cyclist needs to get to grips with.

So, here are the important basics of bike gears you need to know.

1. Left for Front, Right for Rear

SRAM Red eTap vs Di2 vs EPS

If you use mechanical shifting, you will shift the front derailleur with the left and the rear derailleur on the right.

There are 3 major brands for road bike gears and their slight differences in how each of them works.

  • Shimano Total Integration (STI) is a gearshift system introduced in 1990. To shift the rear derailleur, push the gear paddle for a higher gear or push the brake lever for a lower gear.
  • SRAM Double Tap was introduced in late 1995. There’s a single paddle on each side and the gear changes depending on how far the paddle is pushed. For the rear derailleur, a short push will change to a higher gear and a longer push will result in a lower gear.
  • Campagnolo Ergopower works slightly differently compared to Shimano and SRAM. Shifting uses a paddle behind the brake lever and a small button on the inside of the hood. Push the paddle to shift to a lower gear, and press the button to shift to a higher gear.

What if it’s electronic shifting?

That’s where the fun really begins. With electronic shifting, you can customize the shifting according to your preferences.

  • Shimano Di2 uses the E-Tube app to choose from synchro, semi-synchro, and manual shifts.
  • Campagnolo EPS allows you to choose from settings such as standard, inverted, sprinter, inverted sprinter, right only, and left only. This is done through the MyCampy app.
  • SRAM eTap AXS app allows you to fully customize the shifting patterns, similar to Shimano Di2. Unlike the first generation eTap, the eTap AXS is now fully customizable.

2. Keep Pedalling when Shifting

It’s important to remember to keep pedaling when you’re shifting gears. 

The movement between gears requires you to be moving forwards while easing back on the pressure on the pedals to help the derailleur move the chain across the cassette or into the big ring upfront. 

If you don’t pedal when shifting, nothing will happen until you start pedaling. If you’re lucky, all you will hear is a painful crunch as your derailleur tries to shift multiple gears at once and you will experience a drastic shift in torque needed to move forward. 

At worst, your chain will get stuck and will require you to get off the bike and manually change back up the gears while gently pedaling to help make the shift.

3. Back Off the Power

Talking of shifting under tension, don’t do it. 

Easing back slightly on the power when changing helps your derailleur shift smoothly across the cassette. The same applies to the front derailleur; the chain is being put under lateral tension as it goes between the small and big ring. Adding pedal tension simultaneously results in an awkward and noisy shift and will contribute to faster chain and cog wear.

The ideal shifting technique would be to plan for the shift in advance, prepare to shift, ease up on the power, make the shift and get immediately back on the force. 

If you have a well-maintained groupset, you will not feel a thing, and the shift should be almost silent, smooth, and effortless.

Read More : The 9 Best Cycling Power Meters

4. Anticipate the Shifts

You should ideally anticipate gear shifts the same on a bike as you would in a car. 

Look far enough ahead to see what gear you’re likely to need and shift into it just before you hit that point. This works best when you’re about to hit a sharp gradient, if you’re coming up against traffic calming measures or when anticipating a descent.

If you’re already in the gear you need, you can maintain cadence and power and ease through the terrain or situation smoothly and while in full control of your power and the bike.

5. Avoid Cross Chaining

Cross Chain Shifting

Cross chaining is where you’re in the extremes of one or the other gear and force the chain to cross the chainstay.

For example, being in the big chainring while in the biggest cog on your cassette, or the small chainring and the smallest cog on the cassette.

Not so long ago, it was regarded as detrimental to your drivetrain if you cross chained. Newer groupsets are able to cope with cross chaining but you should still never do it.

Cross chaining looks terrible and is very inefficient with your power.

Any gear changes from that position are going to lose you speed, power, or both. It can also be noisy on mechanical drivetrains, which nobody wants to hear.

Finally, cross chaining can cause chain slap or chain stretch depending on which way round you’re riding. Small chainring, small cog allows a very loose chain and the opportunity for it to slap not very gently on your frame.

Big chainring and big cog stretch your chain to its limit while pulling your derailleur forward. That’s not so good either.

If you’re an early adopter of 1x, you won’t have this problem!

Read More : 7 Basic Bike Maintenance Tips for All Cyclists

6. Maintain A Consistent Cadence

Maintaining a consistent cadence when on the road is all about efficiency.

It’s about making the most ground with the least amount of stress on the body for the least amount of energy burned. Wherever possible, keeping to your most comfortable cadence will see you manage your gears efficiently to pedal at a steady, sustainable speed.

There is no perfect cadence.

Some riders are comfortable pushing harder at a slower cadence while others like to spin. I’m a spinner and average between 85-95 rpm depending on the terrain.

You will naturally find a comfortable cadence unless you’re training for something specific, it makes sense to stick with what you’re comfortable with.

Maintaining cadence is about gearing and anticipating the terrain ahead. Shifting gears in good time and always selecting the right gear will help you maintain that cadence.

7. Shift in Sequence

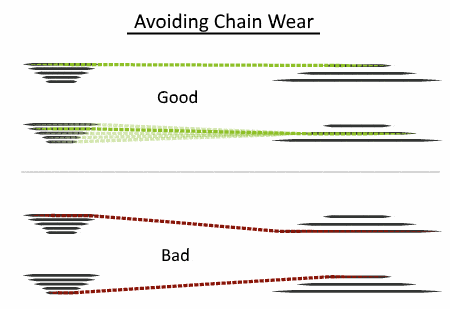
When shifting from the big chainring to the small chainring upfront, you should move up at the rear to match your front shift in order to maintain your cadence.

You have two options here.

You can shift both at once if you have electronic shifting or a well maintained mechanical groupset, or shift to a harder gear at the rear first before you shift down at the front.

This takes practice but is all part of pedaling efficiency.

Shifting into a harder gear at the rear just before you shift down at the front will ensure you can still deliver power immediately after the change.

If you don’t shift at the back you will experience a sudden increase in cadence and drop in power as resistance drops. Shifting one or two cogs down at the rear will equalize the gears and help you maintain power and cadence as you shift.

As I mentioned at the top, shifting gears on a bike is part science, part instinct, and part experience.

It is something that takes practice but will reward you with a much more satisfying ride as a result.

If you’re training for an event, getting your gearing right is fundamental to pedaling efficiency and the only way you’ll get to the end either with the group or at all!

Chris Ireland

Chris Ireland is a staff writer covering everything road cycling. He has been writing about cycling as a freelance journalist since 2017. In his spare time, Chris loves to ride his gravel and mountain bikes.